WhatsApp: +86 139 2872 8741
Email: [email protected]
Tel:
0086-757-8938 9313
0086-20-8938 9313
Address:
Caochang Industrial Area, Liguang Rd, Lishui, Nanhai, Foshan, Guangdong, China
Reply within 1 hour, 24x7 online service

WhatsApp: +86 139 2872 8741
Email: [email protected]
Tel:
0086-757-8938 9313
0086-20-8938 9313
Address:
Caochang Industrial Area, Liguang Rd, Lishui, Nanhai, Foshan, Guangdong, China
Reply within 1 hour, 24x7 online service
The problem in one line: an EL poster is not printed from one artwork, and a file built for paper will fail on a glowing panel in three specific places.
We print and laminate electroluminescent posters in Foshan, and we review artwork every week. Most delays are not design problems. They are file problems: a missing emission layer, copy sitting in the 5-8 mm dead edge, or an animation idea with no zone map. This page lists what we need, why each rule exists, and where the rules change. If you want the physical limits first, the thickness and bending guide covers the panel itself.
| Item | Requirement |
|---|---|
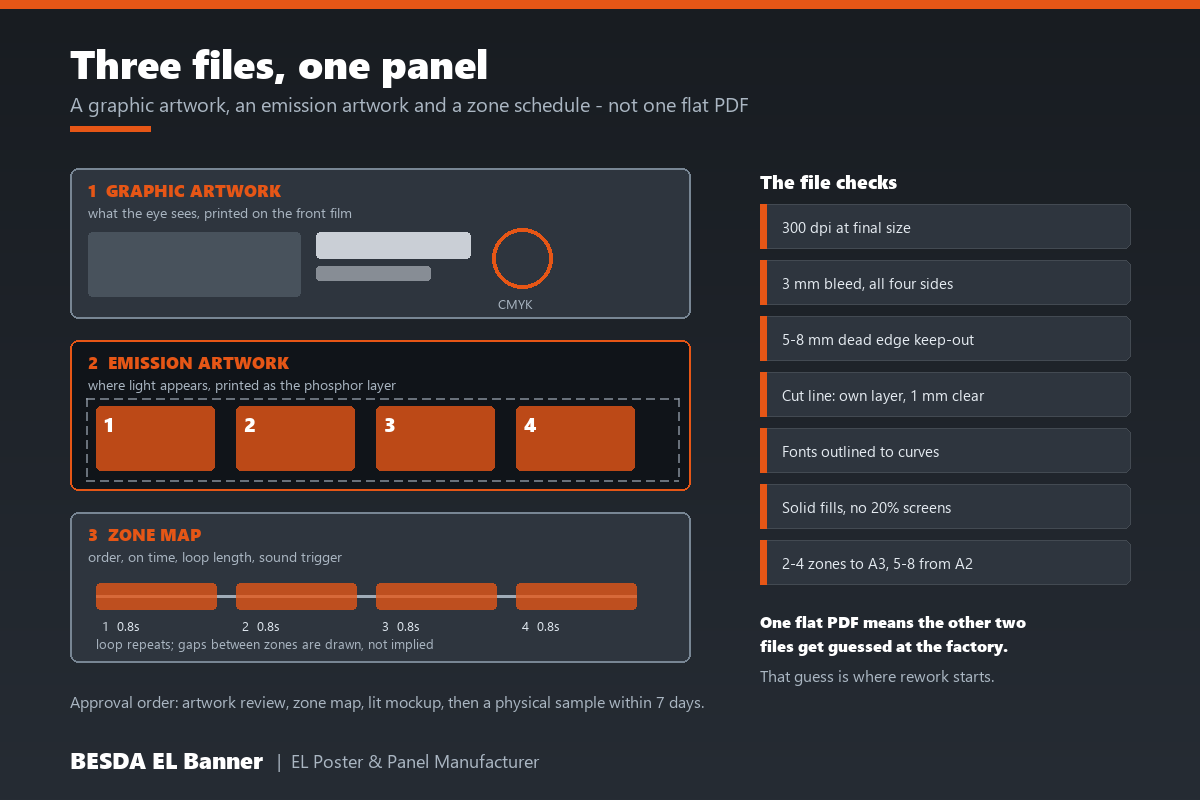
| What we need | Two artworks plus a map: graphic, emission, zone schedule |
| File formats | AI, PDF/X-4, EPS or SVG; PSD or TIFF at 300 dpi; JPEG as reference only |
| Colour | CMYK for the graphic; the glow colour comes from the phosphor palette |
| Bleed | 3 mm on all four sides |
| Dead edge | 5-8 mm unlit border at the silver bus bars; keep copy out |
| Cut line | A separate named layer, at least 1 mm clear of the artwork |
| Zones | 2-4 for A3 and smaller; 5-8 from A2 upward |
| Fonts | Outlined to curves, or packaged with the file |
| Proofing | A lit mockup photo before the physical sample |
| Lead time | Sample within 7 days of mockup approval; runs 7-10 days; bulk 15-20 days |
It is not one image. A working file carries two pictures and one schedule, and each has a different job in the panel.
The graphic artwork is what the eye sees. It is printed on the front film, above the light layers. Every colour, photograph and piece of type lives here. This is the file most designers already know how to build.
The emission artwork is where light appears. It defines the shape of the phosphor layer, so a glowing square, a wordmark outline or a ring of light each become a filled shape in this file. Areas left blank stay dark when the panel is powered.
The zone map is only needed when the panel animates. It numbers each lit zone, sets the order they fire, and states how long each stays on. Two files and one page, and the factory can build the panel without guessing.
A flat PDF contains the first of the three. The other two get inferred by whoever reads the file, and inference is where rework starts. That is the whole reason this page exists: sending the second and third file costs a designer an hour, while deriving them after a proof costs a production cycle.
The panel has two states, and both are judged. Switch the sign off and the customer sees the printed graphic. Switch it on and they see the emission layer shining through the print. A design approved on screen shows only the second state, so the unlit version has to be considered on purpose.
Rework is charged twice. A file error found at artwork review costs an email. The same error found after the phosphor layer is printed costs that layer again, plus the schedule. The review gate exists to catch the cheap version of the mistake.
Warm colours are limited by physics. The standard phosphor palette runs aqua-white, blue, green, yellow, orange and pink. There is no true red. A brand red glows orange to pink, and a designer who knows this plans the layout around it instead of discovering it at the sample.
Half-tones do not survive the medium. Light is emitted per area, so a 20% dot screen produces patchy, uneven glow rather than a soft tint. Lit areas want solid fills. Gradients can print, but the glow behind them stays flat.
The deadline sits on two gates. Artwork review and mockup approval are the only points where a change is free. After the sample is signed, the panel is committed.
Seven thin layers stack into a panel, and two of them take your artwork. From the viewing side they run: printed graphic film with a laminate, clear PET base, transparent ITO electrode, silver bus bars, a copper-doped phosphor layer, a dielectric layer, and a rear electrode.
The front film takes the graphic. Screen printing lays down ink in the order you see it, so this is the familiar part. Fonts are outlined because no font engine sits at the press. A missing font gets substituted, and a substituted font changes the width of a headline.
The phosphor layer takes the emission artwork. Each shape in that file becomes a printed area of light-emitting ink. Overlapping shapes merge, so a zone boundary has to be drawn as a real gap, not as two fills that touch.
The bus bars are ours, not yours. Two silver tracks carry current along the panel edges, and they occupy a 5-8 mm border where nothing glows. That border is fixed by the panel design. Your safe area starts inside it.
The cut line is a separate instruction. The panel is trimmed or cut to shape, so the contour lives on its own named layer and never prints. Keep artwork at least 1 mm inside that line, because screen registration is not exact.
The proof is a lit photograph. A paper proof cannot show a glow. We photograph the mockup with the panel powered, and that image is what you approve.
| Product | What the file must handle | What goes wrong |
|---|---|---|
| Fridge sticker | Small face, battery tail | 2 zones maximum; keep the tail clear of the artwork |
| Bottle wrap | Curved surface, tight radius | Keep key copy away from bends under about 10 mm radius |
| Shelf talker | Read at arm length on a dark shelf | Solid fills and thick strokes beat fine detail |
| Menu board | Read at 2-4 m in low light | Cap height follows distance; avoid thin serifs |
| Window poster | Read from 2-8 m through glass | 150-300 dpi depending on distance; dark field behind the glow |
| Animated poster | Zones fire in sequence | Zone map required, with order and on time per zone |
| Cut-shape panel | Custom outline | Cut line on its own layer, 1 mm clearance, no copy in the dead edge |
| Light box face | Panel sits behind a lip | Size artwork to the visible opening, not to the panel outline |
| Attribute | EL poster file | Ordinary print file |
|---|---|---|
| Colour model | CMYK graphic plus a phosphor glow colour | CMYK only |
| Extra artwork | Emission layer and zone map | None |
| Safe area | 5-8 mm dead edge inside the panel border | 3-5 mm trim allowance |
| Bleed | 3 mm, then trimmed back to the cut line | 3 mm |
| Thin strokes | Hairlines can fill in or break up; confirm at review | 0.25 pt usually holds |
| Half-tones | Solid fills for lit areas | Dot screens are normal |
| Proof | Lit mockup photograph | Paper or soft proof |
| Approval gates | Artwork review, then mockup, then sample | One proof round |
| Change after sign-off | New light layer and reprint | Reprint only |
| Situation | Verdict | Why |
|---|---|---|
| You have vector brand assets and a designer on staff | WORTH IT | Fastest route, and the layers stay under your control |
| Photo-led product artwork | WORTH IT | A 300 dpi raster image embeds cleanly in a vector layout |
| A repeat campaign reusing an approved design | WORTH IT | The emission layer already exists from the last run |
| Only a screenshot or a social media export exists | CONSIDER | We can redraw it; scope and approval are confirmed per project |
| One static face for a two-week test | CONSIDER | Skip the zone map and spend the effort on the graphic |
| The design depends on a true red glow | SKIP IT | Red is not in the phosphor palette; orange-pink is the warm end |
| 0.2 mm hairlines carry the look | SKIP IT | Screen printing will not hold them at final size |
| More than 8 animation steps, or video motion | SKIP IT | EL sequences zones; it does not play frames |
| Copy placed in the outer 8 mm of the panel | SKIP IT | That border is the bus bar and never lights |
Some briefs are better served by another medium, and review is the cheapest place to say so. A design that depends on 0.2 mm hairlines, a photographic gradient that has to glow, or a sequence with 20 steps will not survive this process. We say which limit applies before the light layer is printed. Where the obstacle is the phosphor palette or screen resolution, we name it and describe the nearest workable version.
1. Set the document to final size. Build at 1:1 in millimetres. Scaling a file up at the end moves every stroke and every safe area with it.
2. Draw the safe area first. Mark the 5-8 mm dead edge and the cut line before placing any content. A layout built inside the safe area cannot drift into the border later.
3. Separate the graphic from the emission. Two layers, clearly named. Anything that must glow is filled in the emission layer; anything that must be seen is built in the graphic layer.
4. Replace half-tones in lit areas with solid fills. Keep photographic detail in the graphic layer where ink behaves normally.
5. Outline the fonts. Convert to curves. If editable text is needed later, package the font files with the job instead.
6. Add 3 mm of bleed and keep the cut line on its own layer. Name that layer so nobody has to guess which line prints and which one cuts.
7. Number the zones and write the schedule. Zone ID, order, on time, loop length, and whether a sound trigger is used. One page, plain text, no video link.
8. Send AI, PDF and the map in one folder. Keep the working file alongside the export. When a question comes back, an editable source answers it in minutes.
Copy in the dead edge. The most frequent error. A headline placed at the panel edge disappears behind the bus bar and the frame lip, and no proof catches it until the mockup.
A single flat file. Sending one PDF means someone else decides which areas glow. That decision then needs approval, and the approval loop costs more than the second layer would have.
RGB screenshots pasted into a layout. The colours shift in CMYK, and the resolution is usually far below what the print needs.
Thin white type on a lit field. The glow bleeds into thin strokes and the letters close up. Use a darker field or heavier strokes.
Zones that touch each other. Two adjacent fills read as one zone when lit. A real gap is needed if the sequence should be visible.
An animation described in words only. A paragraph saying the logo blinks twice cannot be built. The zone map is the build instruction.
| Feature | Advantage | Benefit |
|---|---|---|
| Two-artwork structure | Print and light are specified separately | What you approve is what gets built, with 2 files instead of 1 |
| 5-8 mm dead edge marked up front | Copy never lands on the bus bar | No late reprint of the light layer |
| Zone map with timing for 2-8 zones | Sequence is a build instruction | The animation you imagined is the one that ships |
| PDF/X-4 plus editable source | Press-ready export with a working file behind it | Changes are answered in minutes, not days |
| Lit mockup photograph | You approve a glow, not a paper proof | No surprise at the physical sample |
| Sample within 7 days of approval | Your design is tested on the real medium | Decisions rest on a panel, not a screen |
1. Direct factory source better control quality. Artwork review, screen printing, lamination, zone wiring and QC happen in our Foshan facility, so the file you send is checked by the people who print it.
2. 15+ years professional experience. We have produced electroluminescent displays for beverage, FMCG and retail clients since the early 2000s, and we have seen which files fail.
3. Smooth communication & fast response. One named contact answers artwork questions, and we reply within 1 hour, 24×7, in writing.
4. Small qty acceptable. Most custom EL products start from 5 pcs, so one file can be tested before a rollout.
5. Cooperated with more than 100+ global brands. Brand packs from Europe, the Middle East and the Americas shaped the checklist on this page.
6. Stable lead time & fast delivery. Sample within 7 days of mockup approval, standard runs 7-10 days, larger bulk 15-20 days, all confirmed in writing.
The cleanest job arrives as two artworks plus a map. One file shows the graphic the eye sees. One file shows the areas that must glow. A third page lists the zones and their order. If you send a single flat design, we derive the emission layer and send it back for your approval before anything is printed.
Only as a reference for placement and colour intent. A JPEG has no layers, no cut line and no separation between print and light. We would have to rebuild the file, and rebuilding is the step where errors enter. Send vector art or a layered file at final size.
300 dpi at final size for anything read within about a metre, which covers counters, shelves and fridge doors. A large wall panel read from 3 m or more can drop to 150 dpi. Text and logos should stay vector, so resolution never becomes their problem.
Two to four zones suit A3 and smaller, where the eye is close and the sequence reads as deliberate. Five to eight zones need A2 or larger, or the steps feel rushed. More than eight steps stops reading as animation and starts reading as noise.
True red is not in the standard phosphor palette, so a red logo glows as orange to pink at the warm end. We show the closest match as a lit sample rather than on paper. If red is non-negotiable, plan the red as a printed colour that sits next to a glow in another hue.
Artwork review comes first, then the zone map where animation is used, then a mockup. The physical sample follows within 7 days of mockup approval, and production starts only after written sign-off. Each date is confirmed in writing when your file lands.
A file that prints well on paper is not the same as a file that glows well. Send three things: the graphic, the emission layer and the zone map. Keep copy out of the 5-8 mm dead edge, use solid fills where light shows, and outline the fonts. Then approve a lit mockup instead of a screen. Send your file or a rough layout through our contact page and we will reply within the hour with the checks that apply to your artwork and the dates in writing.
Send the size, quantity and destination country. We reply within 1 hour with feasibility, MOQ and lead time in writing.
Reply within 1 hour, 24×7 online service · [email protected]
Tell us the product, size, quantity and destination country. Attach artwork if you have it.
